
https://developer.twitter.com/
デベロッパーツール
ここが主戦場になります。
こんばんは、編集長です。
半年かかりましたが、ようやくReviveOldPostを復活させることができました。
手っ取り早くやり方をお伝えしたいと思います。
本記事で扱う問題の前哨形態は以下でした↓
肝はReviveOldPost連携でUseYourOwnKeyを生成させること
 WordPress管理画面
→ReviveOldPostsでTwitter連携を一旦解除
→以下に述べるコードを適所挿入
参考:ReviveOldPosts運営による動画説明
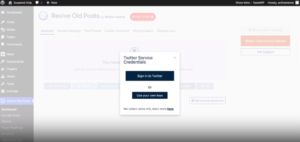
上掲画像のように”SignUpForTwitter”のほかに”UseYourOwnKey”という項目を出現させることが最初にやるべきことです。
そのためにCocoonだったら左欄「外観」→「テーマファイルエディター」→functions.php最後の列に以下のコードを挿入。
add_filter( 'option_rop_first_install_version', '__return_false' );
functions.phpを保存し、ReviveOldPosts管理画面からTwitterアカウントを削除→再接続すれば上掲画面の通り、
UseYourOwnKey
が出るはずです。
しかしUseYourOwnKeyを押しても求められるAPI Key and Secretを入力できないはずです。そのためにTwitterDevelopperツールに行きます。
ReviveOldPostに連携したいアカウントを選択して上掲リンクをクリックしてください。トップ画像のようなスペースシャトルのページにゆきます。そこからDevelopper(右上にある項目)をクリックして中に入ってください。
250文字description
さて、TwitterDevelopperツールに入ると250文字の利用の理由を聞かれます。以下コピペでよいでしょう。
I need to use this tool to overview my situation on SNS and collect useful data constantly. Additionally I want to share my posts from my WordPress site.
I use Twitter API to display articles posted from my website onto Twitter timeline automatically. But even if I use Twitter’s API, I will not display them outside of Twitter.
これでDevelopperTool(DevelopperPortal)に入れるはずです。
User authentication settings
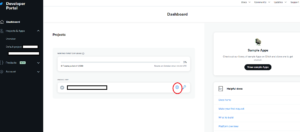 ①赤丸をクリックし中に入り
↓
②User authentication settings
↓
③SetUp
↓
④“read & write”と“Web App, Automated App or Bot”の項目を選ぶ
↓
AppInfoには⑤Callback/Redirect URLは
https://example.com/wp-admin/admin.php?page=TweetOldPost
を入力(example.comは自分のサイト)
↓
⑥Website URLは
https://example.com
を入力(example.comは自分のサイト)
↓
⑦Save
DevelopperPortalの中に入ったら、PROJECT APPができているので、上掲画像赤丸から入って上の①~⑦のようにしてください。
API Key and Secret取得
 トップに戻り青丸のカギから入り
→API Key and SecretのRegenerateをクリックすれば
お目当てのキーが手に入ります。
最後に上掲画像のようにしてAPI Key and Secretを入手してください(コピペ)。
あとはそれを使ってUseYourOnwKeyに入力すれば晴れてReviveOldPosts復活です!
お疲れさまでした。
いや~・・・別のプラグインやら、Twitter自動投稿も試しましたがダメしたね。
Twitter自動投稿って結構、素人が趣味のホームページみたいにして作っていることが多いみたいですね。
・・・・・・
それでは、今回はここまでです。
最後まで読んでいただき、ありがとうございました。m(_ _)m
最後に・・・
上掲手法は、下記記事に端を発したReviveOldPostsチームとのやり取りで教えてもらいました。
メールコンタクト先とホームページは以下の通り。
メール:contact@themeisle.com
ReviveOldPostsホームページ:https://store.themeisle.com/login/
無料ユーザーなのに丁寧に教えてくれたStefan Cotitosuさんに感謝します。
以下がそのやりとりの最終的な落ちどころとなったものです↓
Thank you for sharing the error code.
To fix this problem, please follow these steps:
Add the below filter in the active theme functions.php file, at the end of the file; this will show the Use your own keys settings.
add_filter( ‘option_rop_first_install_version’, ‘__return_false’ );
Twitter Developer
Login to https://developer.twitter.com with the Twitter account you want to useCreate an App
Add user authentication settings: “read & write”, “web app”
App info (make sure to change these to use your own domain!):
Callback/Redirect URL: https://example.com/wp-admin/admin.php?page=TweetOldPost
Website URL: https://example.com
Make sure to copy both your keys
Revive Old Posts plugin
Delete accounts from Revive Old Posts in WordPress
Choose to create/add a new account “Twitter” button
Choose “Use Your Own Keys” button
Enter your two keys
Login should proceed and everything will be activated
That’s it! The plugin will now be working once again.
Please see this screencast for reference: https://vertis.d.pr/v/pI8ylM
Let us know how it goes and if there is anything else that we can help you with.
これ↑読んでやったほうがわかりやすい、ってひともおられるでしょうね。ご参照ください。
・・・・・
それでは、今回はここまでです。
最後まで読んでいただき、ありがとうございました。m(_ _)m